Back to Episode CreatorMake your first episode
A complete guide to characters, expressions, minigames, branching stories and sharing. Start at the beginning or jump to the feature you need.
1. Open the creator and start a project
Open index.html inside the episode_creator folder. No command prompt is needed. Keep the folder together: its artwork, audio and supporting files are used by the editor.
- Choose New episode. Save an existing draft before replacing it.
- Enter an Episode title in the left panel.
- Choose Look and shared assets: Surviving High School or Cause of Death. This chooses the player’s presentation; you can still choose artwork from either collection.
The left panel holds your scenes, characters and variables. The centre edits the selected scene. The preview on the right plays your episode.
Your draft saves in this browser. Use Save project regularly for a separate editable backup. Clearing browser data can remove the draft.
2. Add characters and their expressions
- Under Characters in the left panel, press + Add character.
- Press Choose first portrait. Search for a character and select their starting artwork with Use this.
- The creator links the portraits catalogued under that original character and game, including expressions and alternate artwork. A count appears beneath the selected portrait.
- Give your character a name. You can rename them for your own story without losing the link to the original artwork.
In a dialogue scene, the centre has one Character selector. Choose a character from your left-hand list, Narrator (no portrait), or Previous character.
After selecting a character, open Expression. Only that character’s linked portraits appear. Use the thumbnails to choose the face or outfit you want. The original assets have expression numbers; the creator does not guess labels such as happy or angry.
Displayed name is optional. Leave it blank to use the character’s name, or enter something like “Unknown voice” for this line. It does not rename the character or change their expressions/emotes; later lines use the normal name again. Text variables such as [[Player name]] work here too.
Keep current expression remembers that character’s last portrait. Their first line uses their starting portrait. Switching to another speaker and back does not reset their face or relationship emotes. Selecting an expression explicitly changes it until changed again.
Previous character follows whoever is active on the route actually played. You can change the expression while keeping Previous character selected. Narrator scenes do not replace the previous character. The editor follows your scene routes to find possible speakers; if several can arrive here, it offers an expression setting for each. Only the active speaker’s expression is changed during playback. Connect your routes first so the editor can identify them.
Grouping follows the existing asset catalogue. Unlabelled artwork may have only one linked portrait; characters catalogued under different aliases are not automatically merged. If you replace a character’s starting artwork with another character, incompatible scene expressions are cleared so those scenes use the new character’s current portrait.
3. Write scenes and narration
- Select a scene on the left, or press + Add scene.
- Give it a useful Scene label, such as Hallway greeting. Labels help you connect routes; they are not dialogue.
- Choose Dialogue / narration as the scene type.
- Write the spoken words in Dialogue and choose the character.
- For narration, select Narrator (no portrait). For a character’s thoughts, tick Thought dialogue (italic).
- Set After this scene to Next scene, a specific scene, or End episode.
Next scene means the following entry in the scene list. Moving scenes changes that sequence. A route to a named scene continues pointing to that scene when you reorder it. After deleting scenes, check any routes that pointed to them.
Duplicate copies the scene’s text, effects, actions and destinations. Review those settings in the copy: an explicitly selected relationship change or score action is copied too.
5. Brief emotion symbols and persistent relationships
One-second emotion symbol adds an exclamation mark, question mark or anger symbol. Alternatively select a One-second emotion image. A selected image takes precedence if both are set. These brief reactions are separate from relationship emotes.
Relationship emojis around the portrait can be Friendship, Romance or Dislike, with up to four icons. Their type and count belong to the selected character.
- Keep this character’s current emotes is the default. It changes nothing.
- Choose a type and count when the relationship actually changes.
- Choose None to clear the character’s relationship icons.
Returning to a character keeps their emotes; unchanged emotes do not repeatedly animate as new changes. For separate relationships, add separate characters to the cast rather than changing one character’s name repeatedly.
6. Choices, destinations and endings
- Add a scene with type Choice.
- Write the Choice prompt.
- Add between one and eight answers. Give each answer its text and a Go to destination.
- Leave Time limit at 0 for an ordinary untimed choice.
- Add the destination scenes and connect their next steps, ending routes with End episode.
Different answers can lead to different scenes or rejoin the same scene. A choice can also change a variable before entering its destination.
For a timed choice, set a whole number from 1 to 32 seconds and choose If time runs out, go to. Timing out or pressing the player’s Wait button takes that route, without applying an answer’s actions. Opening the player menu pauses the countdown.
7. Make your own variables
Press + Add variable in the left panel. Give each variable a unique name, type and starting value.
| Type | Example | Use |
|---|
| Number / score | Detective score = 0 | Add or subtract points; compare against a threshold. |
| On/off flag | Found key = Off | Remember whether something happened. |
| Text / player name | Player name = Alex | Store words and insert them in dialogue. |
Belongs to can be the whole episode or a character. For example, use separate variables named Alex trust and Morgan trust, each assigned to its character. Names must still be unique across the project.
Show value in player displays a counter above the game. Leave it off for hidden flags and story information.
Under On entering this scene or When this answer is chosen, add a change. Numbers can be set or increased/decreased; flags can be turned on/off; text can be replaced. Actions run in their listed order. An optional popup can say “Detective score up!”; avoid numeric change labels such as “Score +1”, which the player filters out.
Numbers are whole integers from −32768 to 32767. Totals wrap if arithmetic exceeds that range. Scene-entry actions run again if a route returns to that scene; use flags and conditions if a reward should happen only once.
8. Conditions and unavailable answers
A Condition (variable branch) scene asks no question. It checks a variable and immediately follows If true, go to or Otherwise, go to.
Numbers support equals, does not equal, at least, greater than, at most and less than. Text supports equals and does not equal; comparisons are case-sensitive. Flags compare against On or Off.
On an individual answer, Enable answer when adds the same kind of check. If the check fails, that answer remains visible but disabled. Keep at least one answer set to Always available, so the player cannot get stuck.
For “found the key AND trust is at least 3”, chain two Condition scenes: the first true route checks trust, and either false route leads to the alternative. For OR, the first true route goes straight to success and its false route checks the second condition.
9. Let players choose their name
- Create a Text variable named Player name, starting with Alex.
- Add a Player name / text input scene. Write “What is your name?” and choose Player name as the variable to store the answer in.
- In the cast panel, name the player’s character
[[Player name]]. - Use text such as
Welcome, [[Player name]]! in later dialogue.
Players can enter up to 24 characters. Text inside the double brackets must match the variable name exactly, including spaces. If you rename a variable, also update any references you wrote. Numbers are not automatically substituted using this notation; use their optional visible counter when needed.
10. Chapter cards: an example
A chapter card is a title screen between parts of your story. It displays a heading and subtitle over the scene background, without a character portrait.
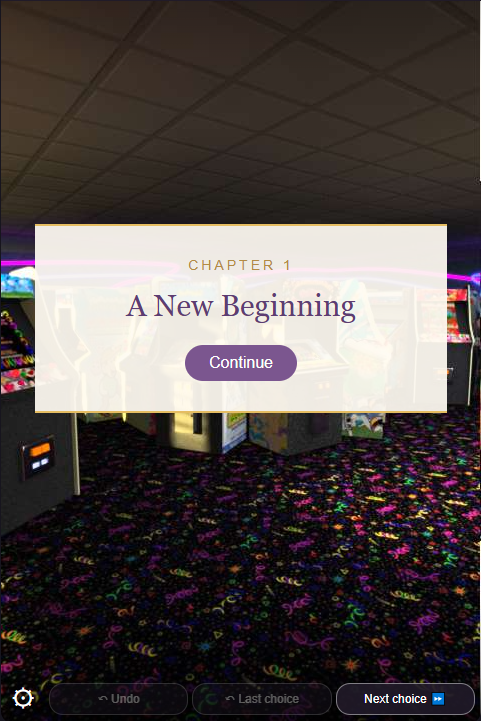 A playable chapter-card example from the included project.
- Add a scene and set Scene type to Chapter card.
- Enter Chapter 1 in Chapter heading and A New Beginning in Chapter subtitle.
- Choose a background and optional music. A blank background keeps the preceding background.
- Set After this card to the first dialogue scene of the chapter.
- Play preview to see it. The player presses Continue to enter the story.
Open Example - Chapter and minigames.json in this folder to edit this example, or its EXP in the reader to play it.
11. Add minigames with winning and losing routes
The creator offers three browser adaptations of activities supported by our reader. They do not reproduce every detail of the original touch games.
For each minigame, write instructions, choose a background and optional music, and set both On winning, go to and On losing, go to. Each outcome can also change your variables. For example, winning could add 1 to Detective score, while losing follows a different conversation. The two routes may rejoin later; neither requires a retry.
Word challenge
- Choose Minigame: word challenge.
- Add between one and twenty words. Each needs a clue and an accepted answer using letters A–Z. Use
KEY|PASS to accept either answer. - Supply letter buttons, or leave that field blank to generate letters from the first answer. Supplied letters must be enough to build at least one accepted answer.
- Set 30–120 seconds per word. The timer resets for each round.
Players type an answer or build it using the letter buttons. Capitalisation does not matter. All rounds must be correct to win. A wrong nonempty answer or a timeout loses immediately. This is a word-building/typing challenge, not a word-search grid.
Timed actions
- Choose Minigame: timed actions.
- Enter helpful actions, one per line, and unhelpful actions, one per line. Avoid identical labels in the two lists.
- Set a timer from 5–30 seconds and a winning score from 1–100.
The player sees a randomly chosen helpful and unhelpful action. Helpful clicks add 1; unhelpful clicks subtract 1, down to zero. At the end of the timer, meeting the target wins; otherwise the player loses. Choose a score that is achievable within the time you allow.
Football
Choose Minigame: football. This adaptation runs for up to 30 seconds or twelve plays. Players choose from available plays, gaining yards; 50 yards scores a touchdown worth seven points. A turnover removes yards and gives the opponent seven points. Finishing ahead wins; a tie or lower score loses. Rules and play options are fixed in this version.
Test both outcomes
For words, test a correct answer, a wrong answer and letting time run out. For actions, test reaching the target and falling short. For football, test finishing ahead and a timeout without scoring. Check that outcome variables and dialogue match. Opening the player menu pauses activity timers. Undo/save restores the minigame entry, rather than a partially completed round.
Example - Chapter and minigames lets you select any of the three games after its opening chapter card, and includes distinct success/failure dialogue.
12. Random scenes and reusable routes
A Random outcome scene chooses among two to eight routes immediately. Each route has an equal chance. Listing the same destination twice makes that destination twice as likely as one listed once.
You can point several scenes to the same later scene to reuse a conversation. You can also loop back to an earlier scene, but include a way out. A loop made entirely of automatic condition/random scenes can hit the interpreter’s loop limit.
The underlying engine has more arithmetic, string and script operations than the visual editor exposes. This editor has no free-form code field or general formula evaluator. Use its variable changes and connected condition scenes for supported logic.
13. Walkthrough: a key and two endings
Build this small episode to practise the whole workflow.
- Add a character in the left panel. Choose their first portrait and name them Alex.
- Add an On/off variable called Found key, starting Off.
- Make five scenes, in this order: Arrival, Search, Check key, Door opens, Locked out.
- Arrival: dialogue by Alex saying “There must be a way inside.” Choose an expression, background and music. After this scene: Search.
- Search: Choice, with prompt “Where do you look?” Answer “Under the mat” goes to Check key and sets Found key to On. Answer “Try the handle” goes to Check key and sets Found key to Off.
- Check key: Condition, Found key equals On. True goes to Door opens; otherwise goes to Locked out.
- Door opens: Alex says “The key fits!” Keep current expression or choose another expression; optionally set Friendship to 2. After this scene: End episode.
- Locked out: Alex says “We need another plan.” After this scene: End episode.
- Play preview. Try both answers. Then add a five-second limit to Search and send its timeout route to Locked out. Test doing nothing as well.
- Save the project, export EXP, and open that EXP in the reader.
For a second example, open Example - Names and choices.json in this folder. It combines name input, fixed character artwork, thoughts, timed choices and a character-owned score. Its timer is one second; increase it while learning. Its two random routes deliberately rejoin the same scene.
14. Preview and check your episode
Press Play preview, then New game inside the player. Preview builds the current project; edit again and press Play preview again to see new changes.
- Try every answer, including unavailable answers becoming available after a flag changes.
- For timers, test both a successful selection and doing nothing.
- Check character names, expressions and emotes when speakers switch and routes rejoin.
- Check both sides of conditions and every ending. Random routes may need repeated playthroughs.
- Try undo and saving/loading to check the state you expect is restored.
If preview/export reports an error, read the status line near the top. Common causes are a deleted destination, missing text, an input scene with no text variable, invalid minigame settings, or every answer being conditional.
15. Save, share, paste and export
| Option | What it is for |
|---|
| Save project | Downloads editable project JSON. Keep this as your source and backup. |
| Export playable EXP | Downloads a playable archive with selected assets and creator project information. |
| Copy / paste text | Copies the complete project as readable text for sharing in a message. Paste it back into the creator to edit. |
In EXP File Reader, expand Paste episode text, paste the complete copied project and press Play pasted episode. No episode download is necessary, but the reader still needs its bundled artwork and audio. Partial text or a message that truncates the project will not import.
An exported creator EXP can be reopened in the creator for visual editing. Original game EXP files open in a different text-editing mode: their branching, minigames and assets are preserved, and edits must fit the original text slots. Original archives are not fully converted into scene graphs.
Export uses the CSPUD/EXP container and executable story scripts. The supported playback target is our reader. Compatibility with the original mobile games has not been verified, and timed conditional menus use a reader extension.
16. Put the tools online and troubleshoot
These tools work as static websites. Upload the whole intended tool folder to a static host and use its index.html as the entry page. Keep relative paths unchanged. The assets folder is required; asset-data contains wrappers used when opening files directly from your computer. Keep both folders in your local copy.
Project text is not a whole website: it refers to media bundled with the tools. Recipients need the matching creator or reader. The creator does not upload people’s stories to a server. Centerscore, EXP File Reader and the creator preview use the same engine and player files; the creator/reader add only their import and preview controls.
- Expression picker is unavailable
- Choose a named cast character in the scene, then choose their first portrait in the left panel.
- The wrong character or face persists
- Check Character and Expression on the current scene and on the routes leading into it. Explicitly select the intended character at a branch reunion.
- A variable has no visible effect
- Check which action changes it and whether a later condition actually tests it. A character-owned score is independent from the portrait’s relationship-emote controls.
- No sound
- Interact with the player, check its sound button, and confirm that the scene selects an audio asset. Blank music keeps whatever was playing, including silence.
- Where is player appearance selection?
- It has been removed from new scene creation. Choose fixed cast artwork and expressions instead. Older projects retain their existing appearance scenes for compatibility; you can delete them or change their scene type. New appearance scenes cannot be added or duplicated.
- My old project uses typed speaker names
- The editor brings legacy named/portrait scenes into the cast list so they can use the Character and Expression controls. Review the cast and save a new project copy.
Return to the creator